History of photography
Double check your labels- not all are correct.
Camera ObscuraA camera obscura is the ancestor of the photographic camera. The Latin name means "dark chamber". The camera obscura is a darkened box or room with a lens on one end of it .It is used for projecting an image of an external object onto a screen inside.
|

|
To make the camera obscura I scored a long piece of card, with a scalpel, into four squares which each measured fifteen centimetres. I then connected the two ends of it to make a box shape and stuck tracing paper on the top of the box. After that I cut a piece of black paper into a square and cut a small square in the middle for the lens. To find the focal length I held the lens in front of the small square at various distances to see what point the reflection was focused.I then cut out a rectangle of black card to that length and rolled it in a tube and I put the lens on the end of it.Finally I stuck the tube over the small black square and the reflection of the window was projected onto the tracing paper
Make sure that you mention 'focal length' in this description.
Make sure that you mention 'focal length' in this description.
One element I found difficult was drawing the image we saw on the camera because my hand was quite shaky and it was hard to draw the reflection on the tracing paper.
The focal length of the lens is the distance between the lens and the image sensor when the subject is in focus.To alter the focal length change the distance between the lens and the small black square on the top of the camera obscura. We knew it was successful when a very clear image was projected on the tracing paper.
The construction of the camera and the clarity of the image went well however the drawing of what I could see could have gone better if my hand wasn't as shaky.
DSLR Introduction
|
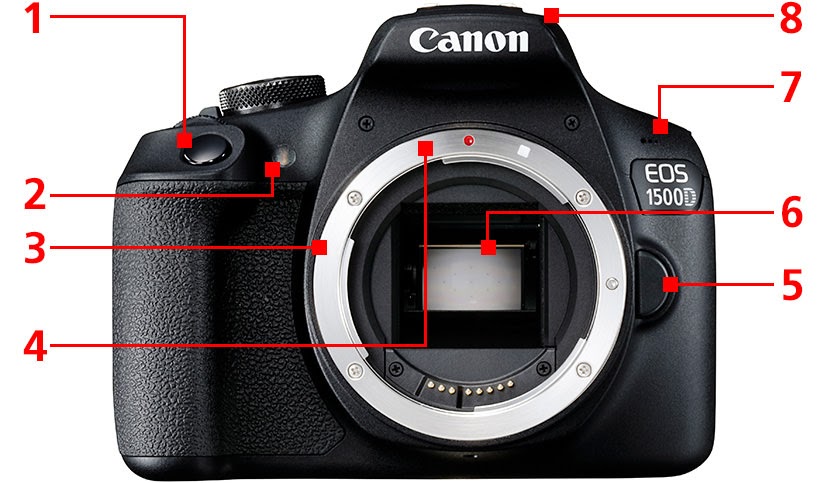
1.Shutter button
2.Self-timer lamp 3.Lens mount 4.Lens mount index 5.Lens release button 6.Mirror 7.Microphone 8.Built-in flash |
|
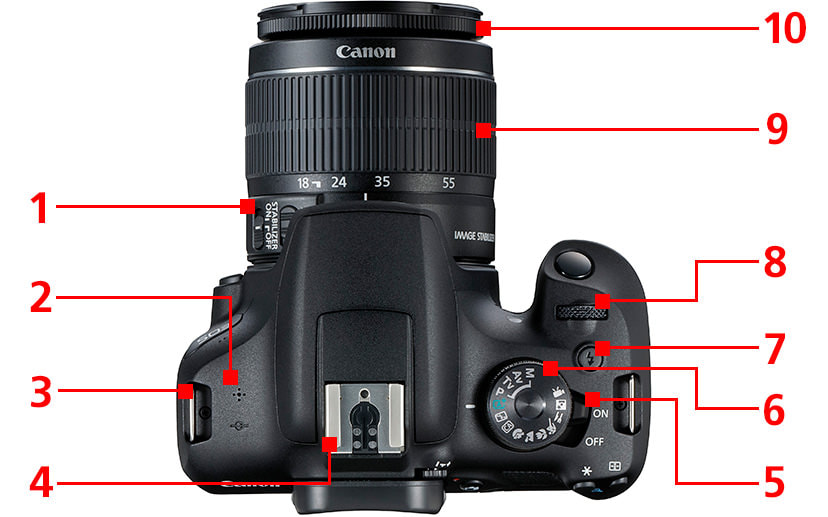
1. Focus mode switch
2.Speaker 3.Strap mount 4.Hot shoe 5.Power switch 6.Mode dial 7.Flash button 8.Main dial 9.Zoom ring 10.Focus ring |
|
|
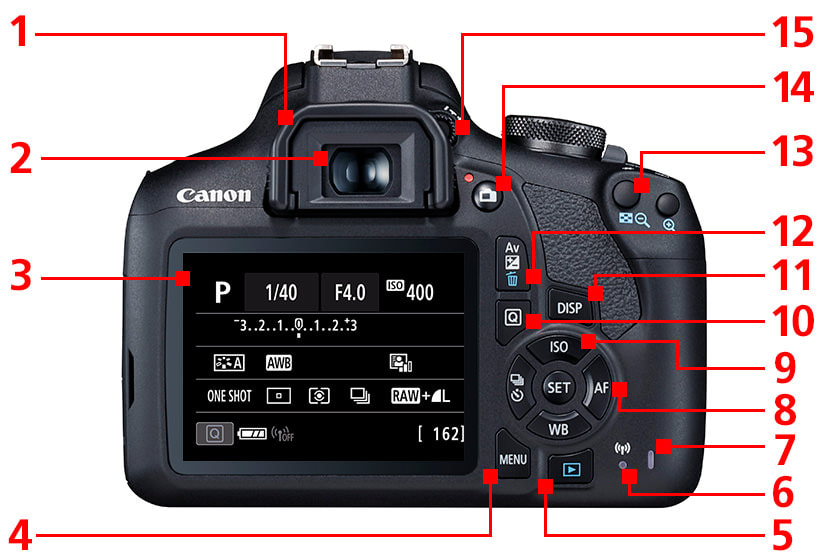
1.Eyecup
2.Viewfinder eyepiece 3.LCD monitor 4.MENU button 5.Playback button 6.WIFI lamp 7.Access lamp 8.Set button 9.ISO speed setting button 10. Quick control button 11.Display button 12.Erase button 13.Focus point selection button 14.Live view shooting 15.Dioptric adjustment knob |
|
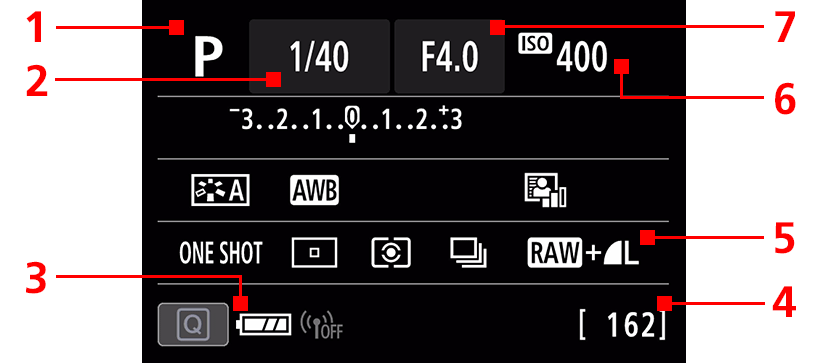
1.Shooting mode
2.Shutter speed 3.Battery level 4.Shots remaining 5.Image-recording format 6.ISO speed 7.Aperture value |
|
My First Photographs
These are my first photographs. My ISO was on sensitivity 400, the program mode was on shutter speed priority and my shutter speed was 1/60th of a second. The theme we were asked to respond to was manmade vs natural and we went into the school carpark to find things to take photos of. For natural photos I took lots of photos of leaves and flowers. For manmade I took photos of fences, doors and anything else we could find in the car park.
Natural


Mandmade


My best edits

|

|

|

|

|

|
Shutter Speed
Shutter speed is the speed at which the shutter of the camera closes and it controls how much light is exposed to the image sensor.Shutter speed is measured in fractions of a second.The setting to be on when using shutter speed is Tv.
Set one photos


Set 2 photos


Best Edits

shutter speed:1/800
ISO:200 |

shutter speed:1/60
ISO:200 |

shutter speed:1/30
ISO:200 |
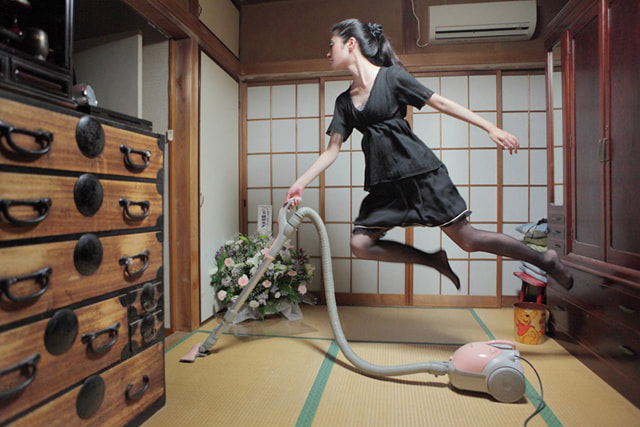
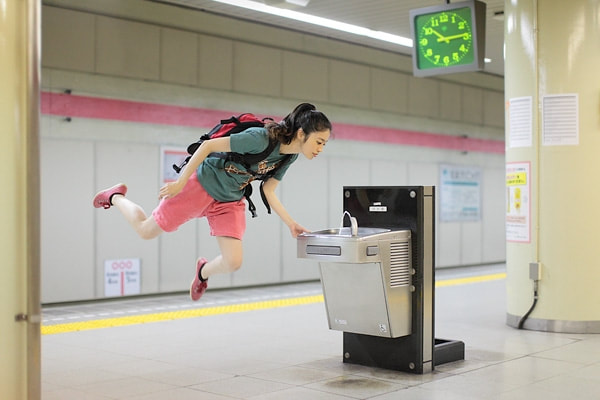
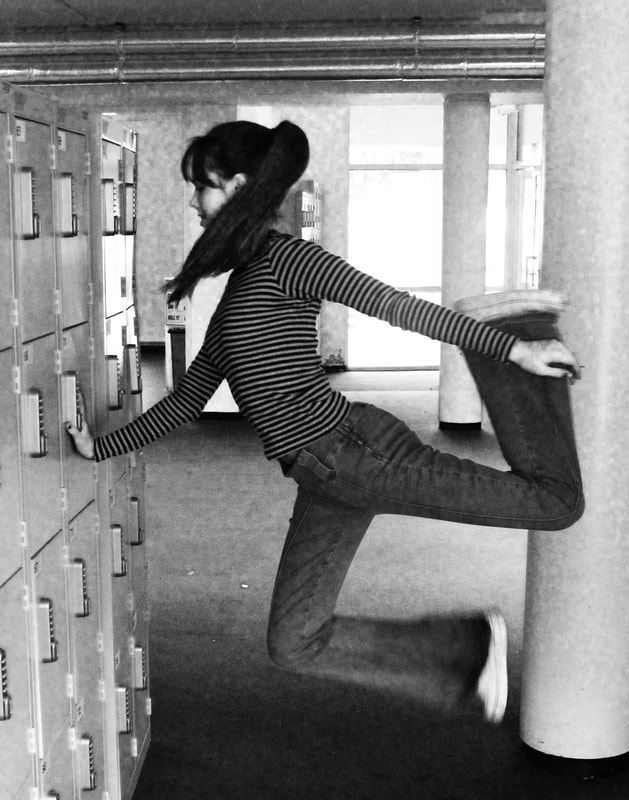
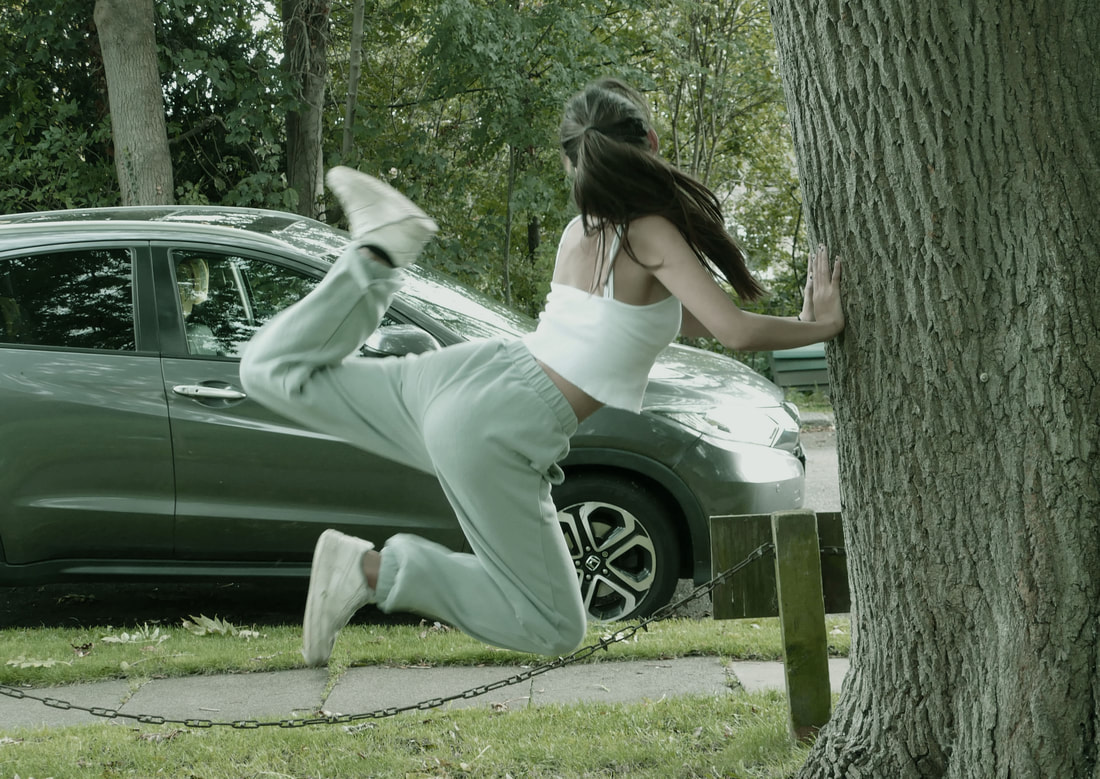
Levitation
The aim of this task was to make the photos we took look like we were levitating in mid air.The cameras were on a high shutter speed so we could get a crisp image.We had to make sure things like our hair,jewellery and lanyards didn't give away that we were jumping.We also had to be aware of the pose we were doing and make it look natural and make it mesh well with the environment.
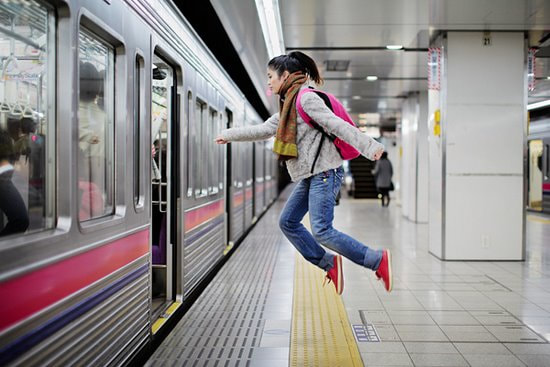
Yowa Yowa
Natsumi Hayashi (yowayowa) is a Japanese photographer who lives in Tokyo.She is known for her levitation photos which make her look like she is floating in mid air.Her levitating photos are supposed to emphasize the natural flow of time.Hayashi shoots with a shutter speed of 1/500th of a second or faster.The position she does is also very important.''I must be aware of the shape of my arms and legs and make slight adjustments in every jump,''she said.
Briefly explain her project
Briefly explain her project
|
|
|
My Response
Best Edits
|
|
To make sure you get the best levitation photos you need to do various things. Firstly make sure things like hair and jewellery does not give away the fact that you are jumping so tie your hair back and take any jewellery off.Secondly, make sure you are on a fast shutter speed so you can get the clearest and the most still image that you can.Finally, the pose you are doing should feel right with the surroundings.
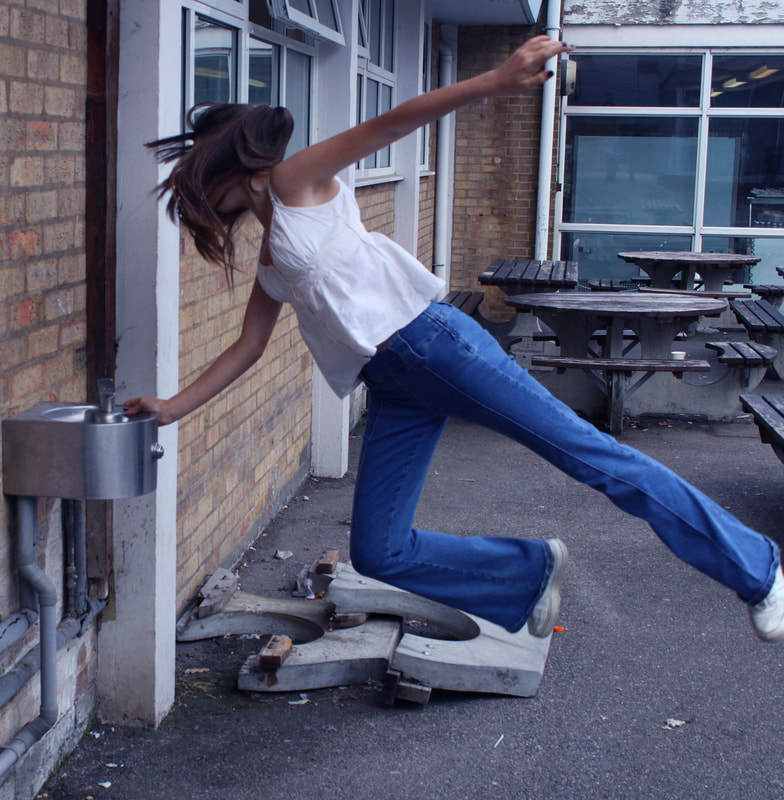
Homework: Levitation images
Best Edit
|
WWW: The photo caught us levitating in the air
EBI: The moving person was completely in focus |
|
Francesca Woodman
Francesca Woodman is an American photographer who in her work likes to address issues like gender and self, representation of the body and disturbing psychological states.She used slow shutter speeds to distort her body in photos to show what is not seen.One example of her work is the picture below which she took in 1976, in this photo her body is blurry and you cant see her face and body clearly.In this piece of work she is considering disturbing psychological states, this is shown by using a distorted unfamiliar figure in an empty unknown setting which makes the viewer contemplate what the silhouette could be.

Blurred movement: Set One


Best Edit
This slideshow is the process of editing my best edit.
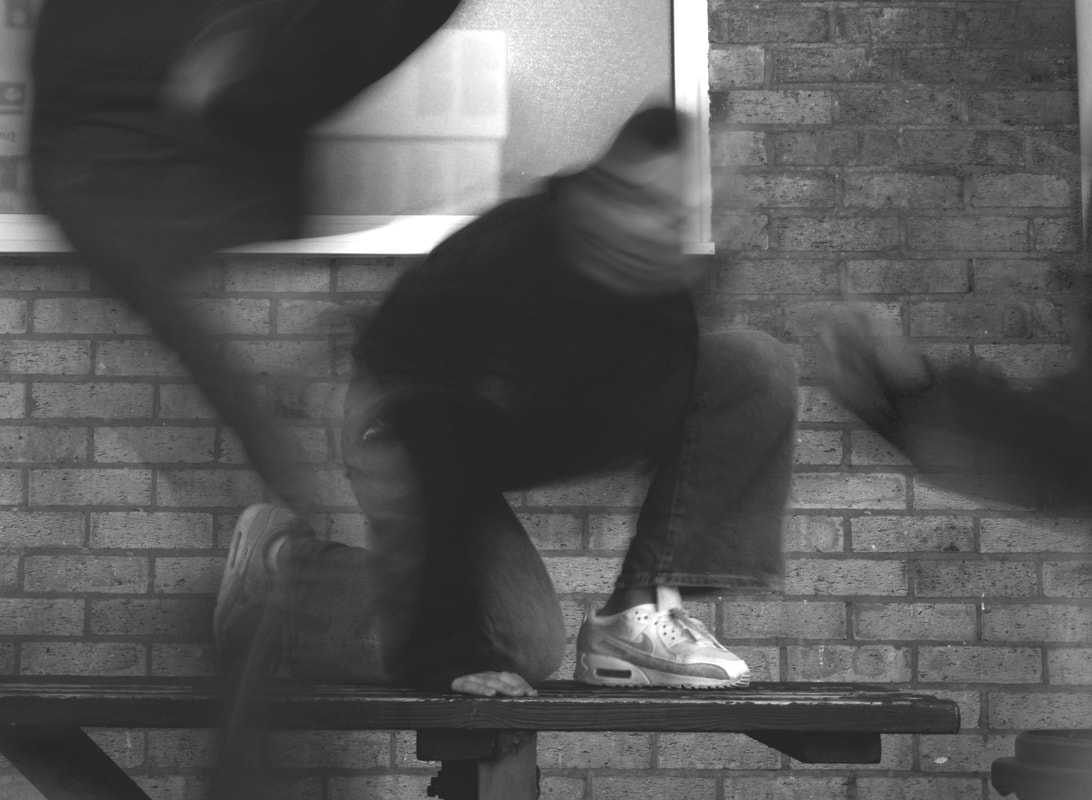
To take these pictures, I used a slow shutter speed and a moving person to create the illusion of a blurred figure.I think that capturing the figure in movement and creating the blurred effect worked well.However I think that the place I took the photos wasn't very good and if I used a different area the pictures could have looked more interesting and more like Francesca Woodman's work.
Set 2


Best Edit
This slideshow is the process in which I edited the best edit.

I took these pictures using the same technique as I did with set one of blurred movement; slow shutter speed and a moving figure.The difference between the two sets was that with set two of the pictures most of the photos were taken in the toilets which worked to make a much more interesting set of pictures.
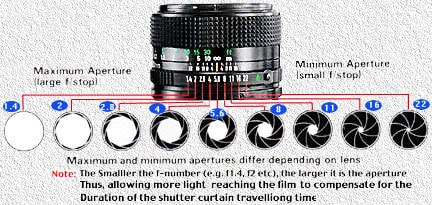
Aperture
Aperture refers to the opening on a lens through which light passes to get into the camera and it controls depth of field.Depth of field is how much distance is in focus in your photo.
Set 1


aperture:5.6 aperture:11.0 aperture:14.0
shutter speed:1/200 shutter speed:1/60 shutter speed:1/30
ISO:400 ISO:400 ISO:400
shutter speed:1/200 shutter speed:1/60 shutter speed:1/30
ISO:400 ISO:400 ISO:400
Set 2


aperture:4.5 aperture:11.0 aperture:29.0
shutter speed:1/640 shutter speed:1/100 shutter speed:1/15
ISO:400 ISO:400 ISO:400
shutter speed:1/640 shutter speed:1/100 shutter speed:1/15
ISO:400 ISO:400 ISO:400
WWW:We used a different aperture for each photo to catch a difference in depth of field.
EBI:We had more people so there could be a noticeable difference in depth of field.
EBI:We had more people so there could be a noticeable difference in depth of field.
Travelling without movement
Eadweard Muybridge
Eadweard Muybridge is a photographer and physiologist who spent his life uncovering the truth of motion.One of his most famous pieces of work was created in 1877 and with this piece he proved that all four of horse's hooves will leave the ground at one point while galloping

Gif one |

|
Final Gif
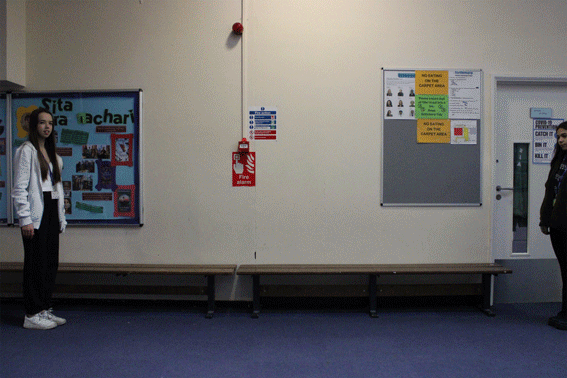
I set up a camera on a tripod and took a series of photos as they took small steps, in between the photos, to make the illusion that they were travelling without moving.As they got to the bench and they had sat down I made it look like Mia was pushing Libby down the bench without touching her by getting Libby to move small bits between each photo.I made the animation on Photoshop by uploading all the pictures and following the steps that were shown in the screenshots above.
